
![]()
So you got the manuscript back from the copy editor or proofreader. Now what?
Well, it’s time to check the changes the editor made, answer their questions, and clear up any remaining issues. The file will probably go back to the editor for some final clean up. If it doesn’t, you have to clear ALL markup to make it ready for the printer/ production department.
There may be a lot of work left. This is typical and does not mean the writing is terrible. The editor might expect as many suggestions on anything she wrote herself; writing is like that. So settle yourself in and let’s go.
Short Version | Video Demo | Long Version | More Guides
 Find out more about using Track Changes starting on pp. 8–27 of the book.
The Short Version
Turn on Track Changes before you work. That makes it easy for everyone to find new content. Just turn it on in Word’s Reviewing ribbon and type as normal.

Please, for the love of all that is holy, do not use your own version of underlining or highlighting to mark changes. Such changes are far easier to miss and much more time consuming to clear. And prone to making it all the way through to the printed document, as this case study attests.
In the edited file, you will see tracked changes and questions to you placed in “comment” bubbles. Address each comment, reply to ones that need more work, and reject any changes you do not like. Changes you like you can just leave alone.
Your version of Word probably looks slightly different. There are approximately 15 iterations possible depending on the combination of Word version and operating system (Mac or PC). Not to mention any customizations you or I have made. But you’ll figure it out.
The Long Version
What to do with an edited file
You can work through the doc from start to finish if you like. Or use the Reviewing ribbon to skip to each “next” tracked change.

1. Address each comment.
-
- Handle the ones you can, then erase them.
- Erase any comments that don’t need to be addressed. For example, ones that say “OK?” and you are, indeed, OK with the change it marks.
- Reply to any item that needs more attention and we’ll figure out a solution together. (Place the cursor on a related word in the document or in the comment itself, then click “New comment” on the Reviewing ribbon, or select New Comment from the Insert menu.)
2. Reject changes you don’t like, then solve them another way.
You might see a change as an indication that something wasn’t clear. This is your chance to do better.
Navigating tracked changes
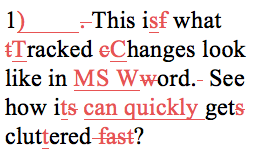
The Track Changes feature in Word will track anything done to a file. Typically, deletions look like crossed out text and additions look underlined. Any changed words are shown in a different colour — a different colour for each person working on the file. (There are options. Two different views are shown below. Let me know if you can’t see the changes.)
![]()

If I was your editor, you will only see changes that I want you to check. So if you told me, for example, to use serial commas, I’ll have done that without tracking the change. They’re “silent.” And if there was a global change such as spelling out all numbers, I’ll show you the first instance, then make the rest of the changes silently.
Use the buttons in the Changes area of the Review ribbon to navigate between the changes, and use the Accept or Reject buttons as necessary. Place your cursor somewhere in the change, then click the button. It will then take the cursor to the next tracked change.
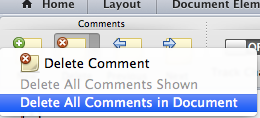
Finalize the file
If the editor is not getting the file back, you need to clear all those tracked changes and comments before you send the product off to the designer. Do these two steps shown below. They’re in the Review ribbon. I really do recommend having the editor review an last minute additions, and the product should be proofread after it is designed, but — eventually — the file will have to be finalized and sent out into the world.

Other takes on what to do with a Word document that contains tracked changes
Read how another editor explains this process. We all have basically the same approach, but their written explanations may make more sense to you:
- Geoff Hart wrote a primer on the topic that you can download as a PDF for future reference.
- Katharine O’Moore-Klopf has posted this summary explanation.
- Carol Saller explained how to decipher a redlined manuscript this way. (HT @kokedit)
- Liz Dexter’s series on how to use Track Changes, customize it, then work with changes that have been tracked.
- And, lastly, here is a case study to convince you to use the Comment and Track Changes feature rather than embedding feedback in the main body of the manuscript, to avoid such a completely embarrassing blunder.
Short link to this post: http://ow.ly/CfzvC
 Turbo boost your skills and get Word to do the heavy lifting for a change.
Buy the full self-study course and get 115 pages of editor-specific instructions for making the most of MS Word 2016 (365). Includes 24 demo videos for both Mac and PC users. Field tested over 7 years with editors around the globe.
Peek Inside the Book